Table of Contents
Unlocking the Power of Next.js: A Comprehensive Guide for Developers
In the fast-evolving landscape of web development, staying ahead with efficient frameworks is paramount. Enter Next.js – a React framework that seamlessly integrates simplicity and power. If you’re a developer eager to harness the potential of Next.js, you’re in the right place. This comprehensive guide will take you on a journey from the basics to advanced features, offering insights into optimizing and deploying Next.js applications. Whether you’re a beginner exploring the framework or an experienced developer aiming to refine your skills, let’s dive into the world of Next.js and unlock its full potential.
Getting Started with Next.js
If you’re a developer looking to streamline your web development process while embracing the power of React, Next.js is the framework for you. In this guide, we’ll walk you through the essential steps to get started with Next.js, from installation to creating your first Hello World example.
Installation and Setup
Getting Next.js up and running is a breeze. To begin, make sure you have Node.js installed on your machine. Open your terminal and run the following command to create a new Next.js project:

You need to replace “my-nextjs-app” with your preferred project name. This command sets up a new Next.js project with a default structure and necessary dependencies.
Project Structure
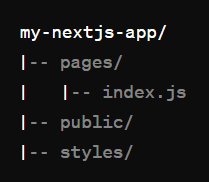
Understanding the project structure is crucial for efficient Next.js development. Once the installation is complete, you’ll find a set of directories and files that form the backbone of your Next.js application. The key directories include:
pages: Contains your application’s pages. Each JavaScript file in this directory represents a different route.
public: Houses static assets such as images, fonts, and other files.
styles: For storing CSS files, allowing you to define styles for your components.
Here’s a simplified view of the project structure:
Hello World Example
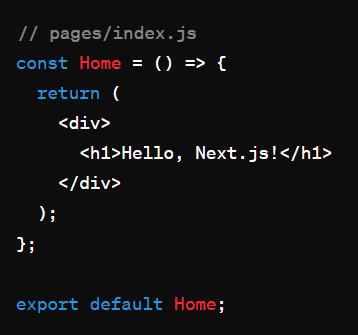
Now, let’s create a simple Hello World example to ensure everything is set up correctly. Open the index.js file inside the pages directory and replace its content with the following:
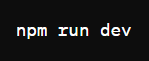
Save the file, and in your terminal, run:
Visit http://localhost:3000 in your browser, and you should see your Hello World message.
Key Concepts in Next.js Development
Next.js simplifies web development by introducing key concepts that enhance the performance and efficiency of your applications. Understanding these concepts is essential for harnessing the full potential of Next.js.
Pages and Routing
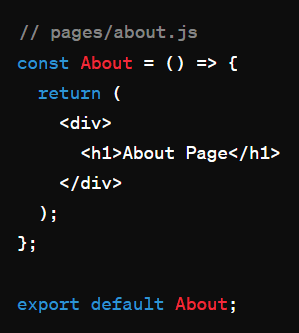
In Next.js, each JavaScript file inside the pages directory represents a different route in your application. This convention-based routing system allows for intuitive navigation. For example, a file named about.js in the pages directory automatically creates a route at /about.
Server-Side Rendering (SSR)
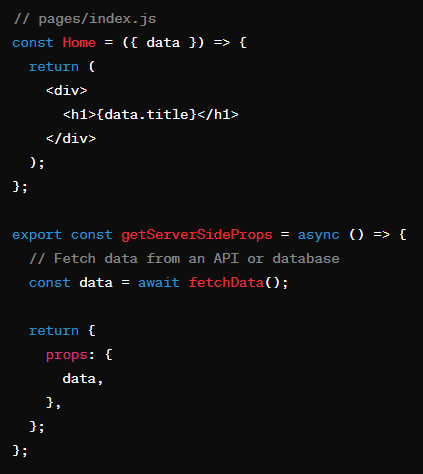
Next.js offers Server-Side Rendering (SSR), a powerful feature that improves performance by rendering pages on the server instead of the client. This ensures faster initial page loads and better SEO. To implement SSR, use the getServerSideProps function in your page components.
Static Site Generation (SSG)
Static Site Generation (SSG) is another Next.js feature that enhances performance by generating HTML pages at build time. This approach is suitable for content that doesn’t change frequently. To implement SSG, use the getStaticProps function in your page components.

Understanding and implementing these key concepts in Next.js will empower you to build dynamic and performant web applications. You need to experiment with these features to find the best fit for your specific use cases.
Advanced Features and Best Practices
Now that you have a solid understanding of the basics, let’s explore some advanced features and best practices that will elevate your Next.js development skills.
API Routes
Next.js simplifies backend development by introducing API routes. These routes allow you to create powerful serverless functions within your Next.js application. To create an API route, add a new file inside the pages/api directory. For example, let’s create an endpoint that returns a JSON response:
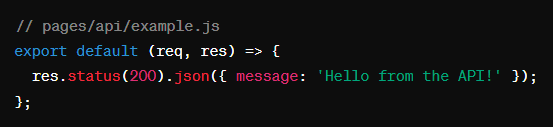
Your API endpoint is now accessible at http://localhost:3000/api/example.
Data Fetching
Next.js provides various methods for fetching data, catering to different scenarios. Understanding these methods is crucial for optimizing your application’s performance.
Client-Side Data Fetching: Use getStaticProps to fetch data at build time and generate static pages.
Server-Side Data Fetching: Utilize getServerSideProps to fetch data on every request, ensuring fresh content for dynamic pages.
Static Data Fetching: Leverage getStaticPaths for dynamic routes with static data.
Here’s a quick example of static data fetching:

Styling
Styling in Next.js offers flexibility. You can choose from various approaches, including CSS modules, styled-components, or global styles. CSS modules are a popular choice, providing local scope for your styles.

Testing
Testing is a critical aspect of maintaining a robust application. Next.js supports various testing methodologies. Popular tools include Jest for unit testing and Cypress for end-to-end testing.
Ensure your testing setup aligns with your project requirements. A simple Jest configuration might look like this:

By incorporating these advanced features and following best practices, you’ll enhance the functionality, performance, and maintainability of your N.js applications.
Optimizing and Deploying Next.js Applications
Optimizing and deploying your N.js application is crucial to ensure fast loading times and a seamless user experience. In this section, we’ll cover essential optimization techniques and deployment options.
Performance Optimization
Optimizing the performance of your N.js application involves several key considerations. One powerful feature is the ability to leverage automatic code splitting. This ensures that only the necessary code for a specific page is loaded, reducing initial load times.
Additionally, optimize images by using responsive image techniques and lazy loading. N.js provides built-in support for these practices through the next/image component.

Deployment Options
Next.js applications can be deployed to various platforms, each offering unique advantages. Two popular choices are Vercel and Netlify, both designed for seamless deployment of N.js applications.
Vercel
Create an Account: Sign up for a Vercel account.
Connect to Git: Connect your N.js project repository to Vercel.
Configure Settings: Customize deployment settings, such as environment variables and domain names.
Choose a deployment platform based on your preferences and project requirements. Both Vercel and Netlify provide seamless integration with N.js, automatic SSL, and global CDN distribution for optimal performance.
Netlify
Sign Up: Register for a Netlify account.
Connect to Git: Link your N.js project repository to Netlify.
Configure Build Settings: Set build commands and environment variables as needed.
Choose a deployment platform based on your preferences and project requirements. Both Vercel and Netlify provide seamless integration with Next.js, automatic SSL, and global CDN distribution for optimal performance.
SEO Considerations
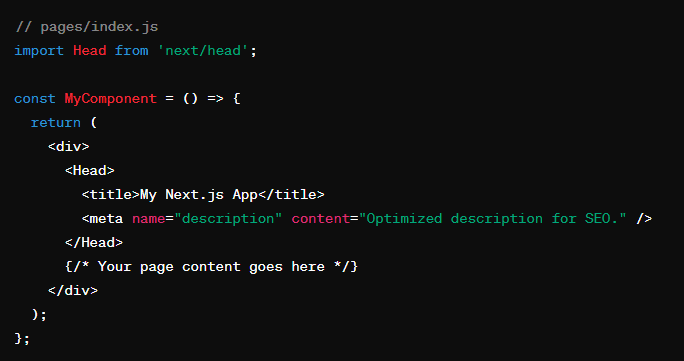
Search Engine Optimization (SEO) is crucial for increasing the visibility of your N.js application in search engine results. N.js simplifies SEO by automatically adding essential meta tags to your pages. Ensure that you customize these tags for each page using the Head component.
By optimizing performance, choosing the right deployment platform, and paying attention to SEO considerations, you’ll ensure that your N.js application not only performs well but also ranks favorably in search engine results.
Conclusion
Congratulations on completing this comprehensive guide to N.js development! We’ve covered everything from the foundational aspects to advanced features, optimization techniques, and deployment options. As you embark on your journey with N.js, keep these key takeaways in mind:
Solid Foundation: Understanding the basics of N.js, from installation to project structure, is crucial. This knowledge forms the basis for more advanced development.
Advanced Features: Explore the power of API routes, various data fetching methods, flexible styling options, and effective testing practices to enhance the functionality and maintainability of your N.js applications.
Optimization: Prioritize performance optimization by leveraging automatic code splitting, responsive image techniques, and lazy loading. These practices contribute to a faster and more efficient user experience.
Deployment Options: Consider deploying your N.js application on platforms like Vercel or Netlify. These services offer seamless integration, automatic SSL, and global CDN distribution, ensuring optimal performance and accessibility.
SEO Best Practices: Pay attention to SEO considerations by customizing meta tags using the Head component. This ensures that your N.js application is well-optimized for search engine visibility.
As you continue to explore and build with N.js, don’t forget to stay updated on the latest features and best practices. The Next.js community is vibrant, and resources such as documentation, forums, and tutorials are readily available.