Unveiling Angular: A Comprehensive Guide for Web Developers
Embarking on a journey into the realm of modern web development often leads developers to discover the power and versatility of Angular. In this comprehensive guide, we delve into the intricacies of Angular, exploring its core concepts and advanced features. Whether you’re a novice eager to set foot in the Angular universe or an experienced developer aiming to refine your skills, this guide is your roadmap to mastering Angular. From the fundamental steps of project setup to the intricacies of advanced topics like routing, forms, and HTTP client usage, join us as we unravel the capabilities of Angular and equip you for web development excellence. Let’s dive in and unlock the full potential of Angular together!
Table of Contents
Getting Started with Angular
Angular, a powerful front-end framework developed and maintained by Google, has become a go-to choice for building dynamic and robust web applications. If you’re new to Angular, this guide will walk you through the essential steps to get started with this framework.
Setting Up Your Angular Project
Step 1: Install Node.js and npm
Before you begin with Angular development, ensure that Node.js and npm (Node Package Manager) are installed on your machine. You can download and install them from the official Node.js website.
Step 2: Install Angular CLI
Angular CLI (Command Line Interface) is a command-line tool that simplifies the process of creating and managing Angular projects. Install it globally using the following npm command:

Step 3: Create a New Angular Project
With Angular CLI installed, you can create a new project with a single command. Navigate to the desired directory and run:

You need to follow the prompts to set up additional configurations, such as routing and stylesheets.
Exploring the Angular Project Structure
Once your project is created, it’s essential to understand the basic structure of an Angular application. Here are the key directories:
- src: Contains your application source code.
- app: The main folder for your application components.
- assets: Stores static assets like images and styles.
- angular.json: Configuration file for Angular CLI.
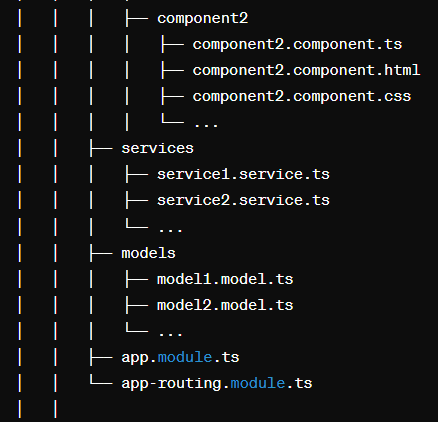
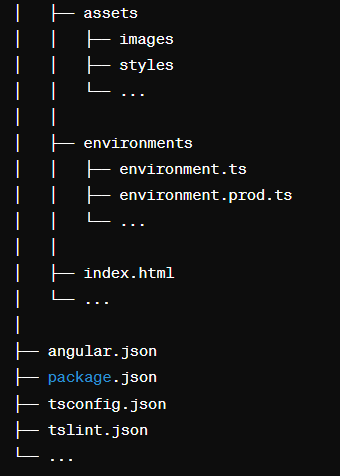
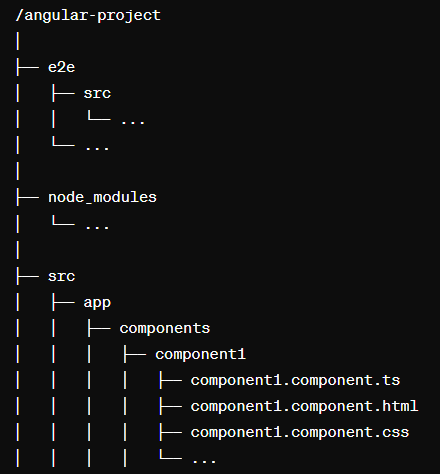
Explanation:
e2e: End-to-End testing configuration and source files.node_modules: Node.js dependencies and packages.src: The main source code of the Angular application.app: The main module of the application.components: Contains individual Angular components.services: Angular services for handling business logic.models: Data models used in the application.app.module.ts: The main module where components, services, and other modules are declared and imported.app-routing.module.ts: Angular routing configuration for navigation.
assets: Static files such as images and styles used in the application.environments: Configuration files for different environments (e.g., development, production).index.html: The main HTML file that serves as the entry point for the application.angular.json: Angular project configuration file.package.json: Node.js package configuration file.tsconfig.json: TypeScript configuration file.tslint.json: Configuration file for TSLint, a static analysis tool for TypeScript.
This structure is a general guideline, and depending on the project’s size and complexity, additional directories or organization may be required. Also, Angular CLI provides commands to generate components, services, modules, etc., which automatically organize the project structure.
Angular CLI Commands
Angular CLI simplifies common development tasks. Here are some fundamental commands:
ng serve: Launches the development server and watches for file changes.
ng generate: Creates components, services, modules, and more.
ng build: Builds the application for production.
Best Practices for Project Organization
Organizing your Angular project is crucial for maintainability. Consider the following best practices:
- Module-based Structure: Group related components, services, and directives into modules.
- Smart and Dumb Components: Differentiate between smart components (containers with business logic) and dumb components (presentation-only components).
- Services for Data Management: Use services for data management and communication between components.
Components and Directives in Angular
In the world of Angular development, understanding components and directives is fundamental. These concepts form the building blocks of your application, allowing you to create modular and reusable code.
Components: The Heart of Angular
What is a Component?
In Angular, a component is a fundamental building block that encapsulates the logic and view of a specific part of the user interface. Components are crucial for building modular and maintainable applications.
Creating a Component
To create a new component using Angular CLI, you can use the following command:

This command creates the necessary files and folders, including a TypeScript file for your component logic, an HTML file for the template, and a CSS file for styling.
Anatomy of a Component
A typical Angular component consists of three main parts:
- Component Class: Contains the logic for the component.
- HTML Template: Defines the structure and layout of the component.
- CSS Styles: Styles to enhance the component’s visual presentation.
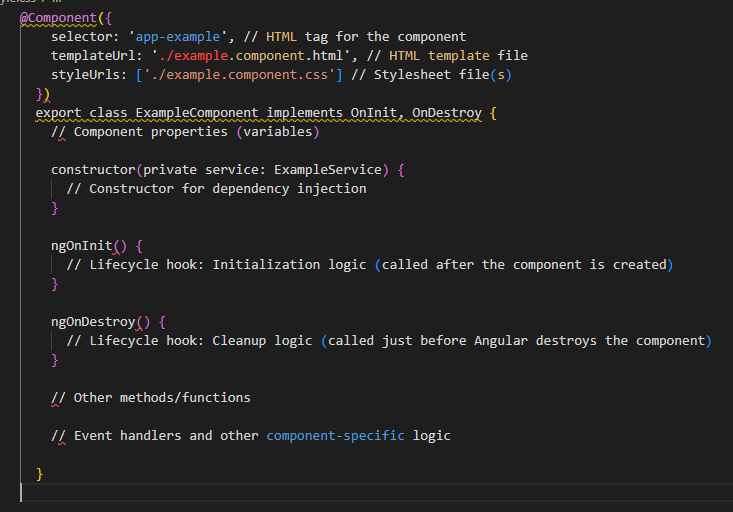
Explanation:
@Component: Decorator used to define metadata for the component.selector: The HTML tag used to include the component in other templates.templateUrl: Path to the HTML template file associated with the component.styleUrls: Array of paths to stylesheet files (CSS or SCSS) associated with the component.
export class ExampleComponent: The class declaration for the component.implements OnInit, OnDestroy: Implementing Angular lifecycle interfaces for hooks likengOnInitandngOnDestroy.
constructor(private service: ExampleService): The constructor where dependencies are injected, in this case, an example service (ExampleService).ngOnInit(): Angular lifecycle hook called after the component is created. Used for initialization logic.ngOnDestroy(): Angular lifecycle hook called just before the component is destroyed. Used for cleanup logic.- Other methods/functions: Additional methods and functions specific to the component’s functionality.
This visual representation illustrates the key parts of an Angular component, including the decorator, class declaration, lifecycle hooks, constructor for dependency injection, and methods for handling component-specific logic. Keep in mind that the actual content and complexity of a component may vary based on its purpose and requirements.
Directives: Enhancing HTML with Angular Magic
What are Directives?
Angular directives are special markers on a DOM element that tell Angular to attach specific behavior to that element. They are a way to extend HTML functionality, making it more dynamic and interactive.
Common Built-in Directives
ngIf: Conditionally adds or removes elements from the DOM based on an expression.
Certainly! In Angular, ngIf is a structural directive used for conditionally rendering elements in the DOM based on a given expression. Here’s a simple code snippet demonstrating the usage of ngIf to conditionally display elements in an Angular component:

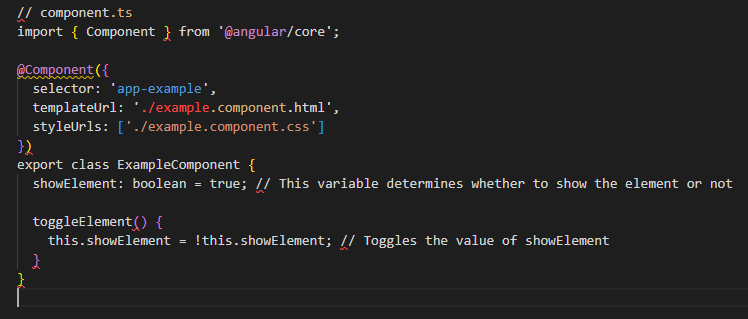
In this example:
- The component class (
ExampleComponent) has a boolean propertyshowElement, which is initially set totrue. - The template (
example.component.html) uses*ngIfto conditionally render the<p>element based on the value ofshowElement. - There’s also a button that triggers the
toggleElement()method when clicked, which toggles the value ofshowElement.
When you click the “Toggle Element” button, it will toggle the visibility of the <p> element based on the value of showElement. If showElement is true, the paragraph will be displayed; otherwise, it will be hidden.
ngFor: Loops over a collection (such as an array) and renders a template for each item.
In Angular, ngFor is a structural directive that allows you to iterate over a collection (such as an array or object) and render a template for each item in the collection. Here’s a basic example demonstrating the usage of ngFor in an Angular component:
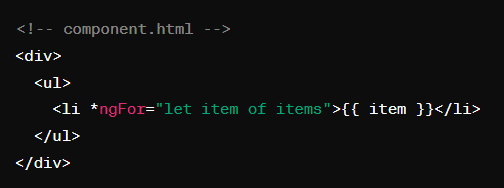
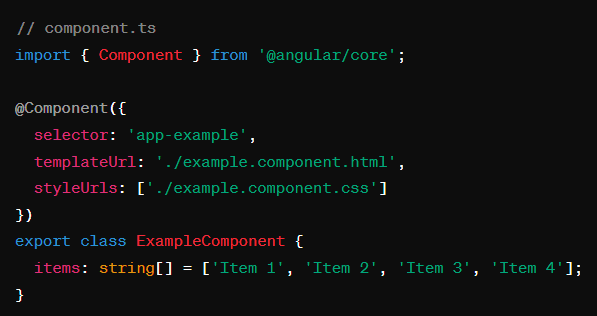
In this example:
- The component class (
ExampleComponent) has an array property nameditemscontaining string values. - The template (
example.component.html) uses*ngForto iterate over theitemsarray and create an<li>element for each item in the array.
In this way, ngFor simplifies the process of rendering dynamic content based on the elements of a collection. You can also use ngFor with objects, and it supports additional features like index tracking and handling changes in the collection.
ngModel: Creates a two-way data binding on form elements.
In Angular, ngModel is a directive that provides two-way data binding for form elements. It allows you to bind the value of an input element to a property in your component, enabling synchronization between the component and the template. Here’s a simple example demonstrating the usage of ngModel:

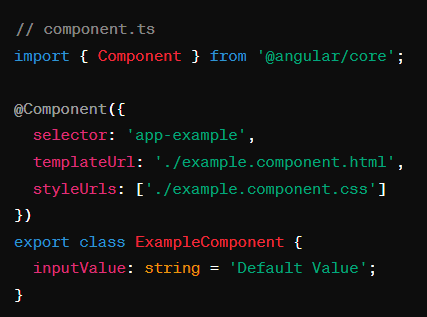
In this example:
- The component class (
ExampleComponent) has a property namedinputValueof type string, initially set to ‘Default Value’. - The template (
example.component.html) contains an input field with[(ngModel)]="inputValue", establishing a two-way data binding between the input field and theinputValueproperty. - The entered value in the input field is automatically synchronized with the
inputValueproperty, and any changes toinputValuein the component will reflect in the input field.
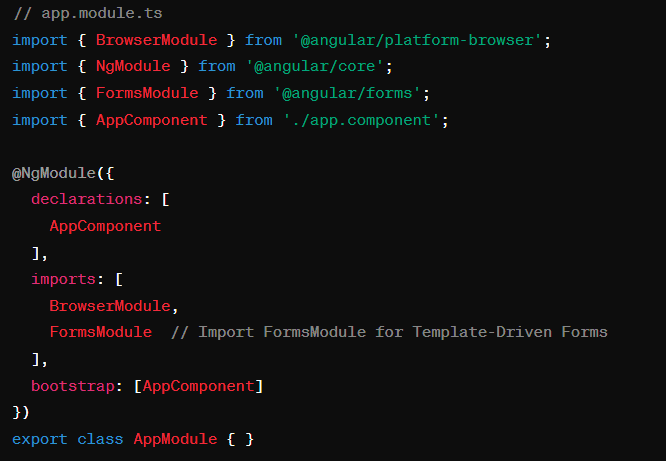
Additionally, to use ngModel, you need to import the FormsModule in your Angular module. Add it to the imports array in the module’s @NgModule decorator:
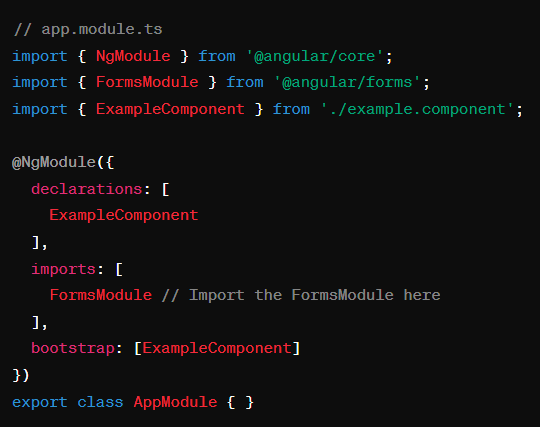
By including FormsModule in your module, Angular gains awareness of the ngModel directive.
Please note that for Angular versions 2 and above, FormsModule is required for using ngModel. For Angular versions 4.0.0 and above, you should use FormsModule from '@angular/forms'.
Creating Custom Directives
While Angular comes with several built-in directives, you can also create custom directives to encapsulate specific behavior and enhance reusability.
Services and Dependency Injection
In Angular development, services and dependency injection play a crucial role in building scalable, modular, and maintainable applications. Let’s explore these concepts and understand how they contribute to the Angular framework.
Angular Services: The Backbone of Application Logic
What are Services?
In Angular, a service is a singleton object that provides a specific functionality or set of functionalities to various parts of an application. Services are essential for encapsulating business logic, data management, and communication between components.
Creating a Service
To generate a new service using Angular CLI, use the following command:

This command creates a service file where you can define methods and properties that can be shared across different components.
Using Services in Components
Once a service is created, you can inject it into components, allowing them to access the shared functionality. Angular’s dependency injection system takes care of providing the instances of services where needed.
Dependency Injection: Making Components Modular and Reusable
What is Dependency Injection?
Dependency injection is a design pattern used in Angular to inject dependencies (such as services) into components, making them modular and loosely coupled. This promotes code reusability and easier maintenance.
How Dependency Injection Works
When a component requires a service, Angular’s injector provides the component with an instance of the service. This mechanism allows components to focus on their specific functionality without worrying about how services are created.
Best Practices for Dependency Injection
Use Single Responsibility Principle: Keep services focused on a single functionality.
The Single Responsibility Principle (SRP) is one of the SOLID principles of object-oriented design, which states that a class should have only one reason to change, meaning it should have only one responsibility. Here’s an example in an Angular context to demonstrate the Single Responsibility Principle:
Let’s say you have a service that fetches data from an API and processes that data. Instead of having a single service that performs both data fetching and processing, you can separate these responsibilities into two classes.
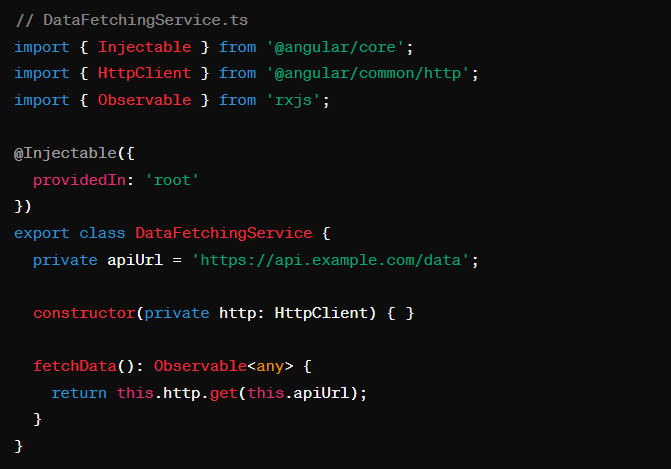
In this example, DataFetchingService is responsible for fetching data from an API using Angular’s HttpClient.
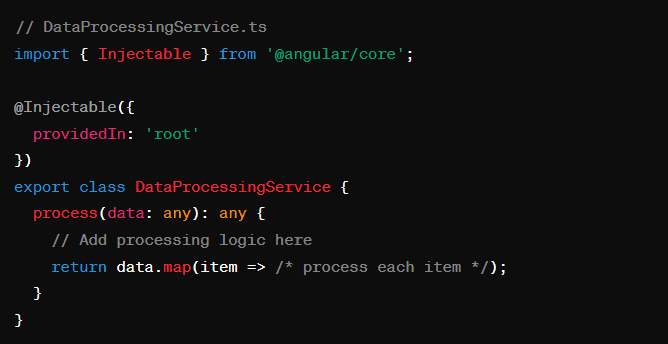
On the other hand, DataProcessingService is responsible for processing the data received from the API.
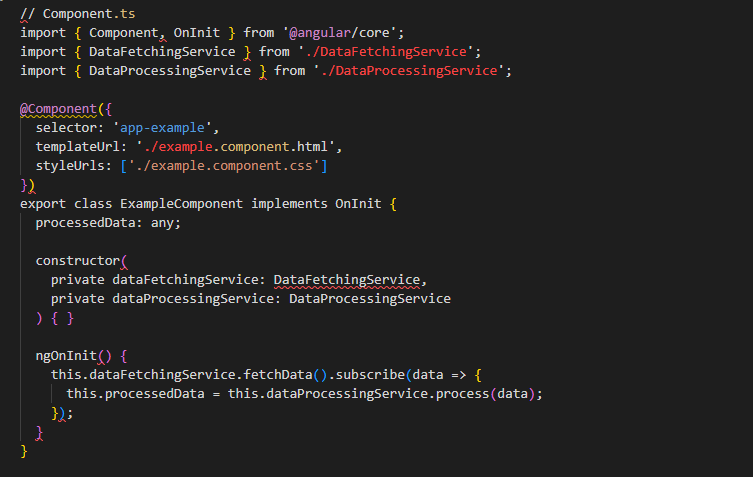
Now, in the component, you inject both services. The ExampleComponent is responsible for orchestrating the workflow by fetching data and then passing it to the processing service. Each class (service) has a single responsibility: one for fetching data and the other for processing data.
By adhering to the Single Responsibility Principle, your code becomes more modular, maintainable, and easier to test. Each class has a clear purpose, and changes in one area are less likely to affect others.
Inject Services at the Component Level: Avoid injecting services at the module level to prevent global state issues.
Injecting services at the component level in Ang… is a common practice, especially when you want to have a service instance that is specific to a particular component and not shared across the entire application. To inject a service at the component level, you use the providers property in the @Component decorator.
Here’s an example:
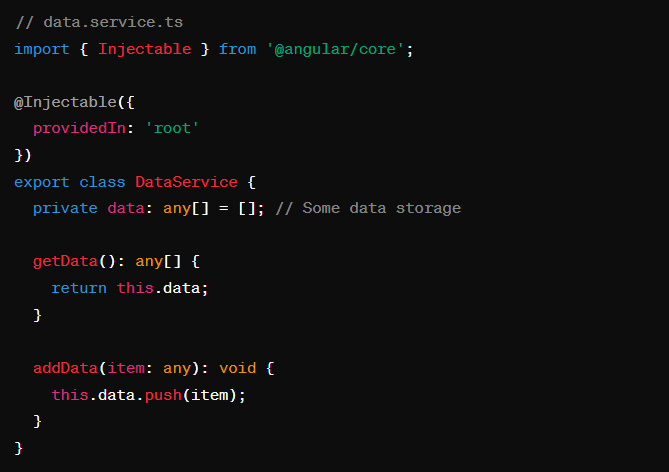
In this example, we have a simple DataService that provides methods to get and add data.
Now, let’s create a component and inject the DataService at the component level:
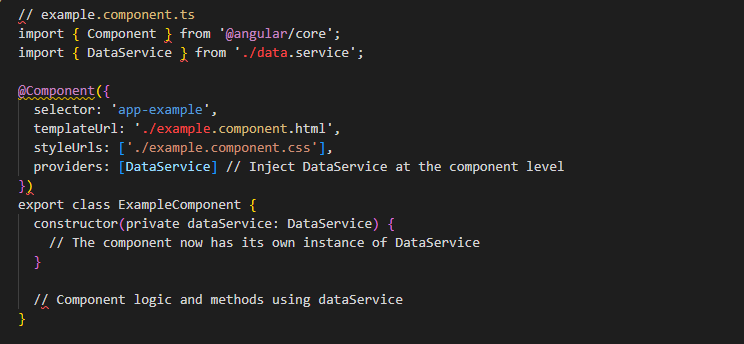
In this component, the providers array in the @Component decorator is used to specify that the DataService should be provided at the component level. This means that this component and its children will use a separate instance of the DataService compared to other parts of the application.
This can be useful when you want to encapsulate certain functionality or state within a specific component and ensure that changes to the service in one component don’t affect instances of the service used elsewhere in the application.
Remember that this approach creates a new instance of the service for the component and its children, but it won’t be shared globally across the entire application. If you want a service to be a singleton shared across the entire application, you would use the providedIn: 'root' approach in the service’s @Injectable decorator, as shown in the DataService example.
Leverage Hierarchical Dependency Injection: Understand the hierarchy of injectors in Ang… for effective dependency management.
Hierarchical Dependency Injection (DI) in Ang… allows you to create a hierarchy of injectors, which can be beneficial in certain scenarios. This is particularly useful when you want to provide a service at a specific component level, creating a scope for that service within the component and its children. Here’s an example:
Assuming you have a service:
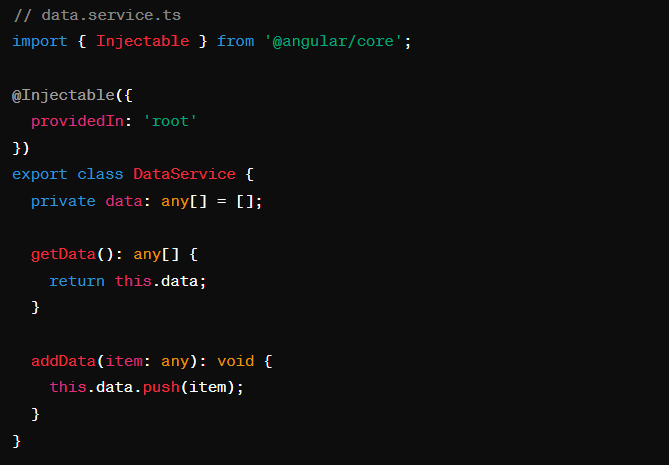
Now, let’s create a parent component and a child component, each having its own instance of DataService:
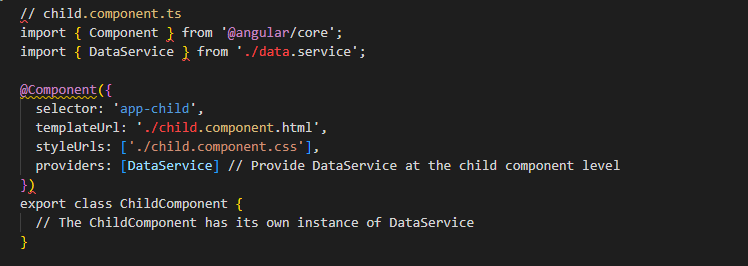
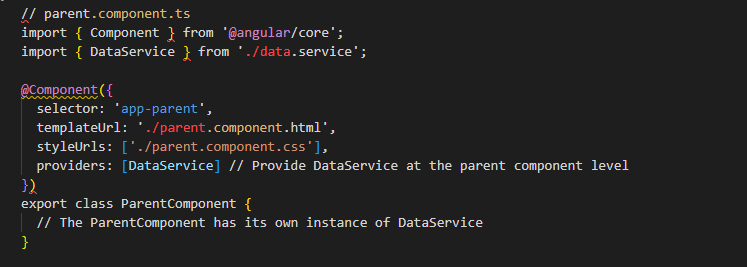
In this example:
- Both
ParentComponentandChildComponentdeclare a dependency on theDataServiceand provide it at their respective component levels using theprovidersarray in the@Componentdecorator. - The
DataServiceinstances are now hierarchically injected, meaning that each instance of the component gets its own instance ofDataService, and changes to one instance won’t affect the other. - This can be beneficial when you want to encapsulate state or functionality within a specific component and its children, and you don’t want these components to share the same instance of a service.
Remember that this approach creates a hierarchy of injectors within the component tree. It’s particularly useful for scenarios where you need local scoping of services within specific branches of your component tree.
Understanding services and dependency injection is key to building scalable and maintainable Ang… applications. In the next section, we’ll dive into advanced Angular topics, including routing, forms, and HTTP client usage.
Advanced Angular Topics
As you continue your journey in mastering Ang…, it’s time to explore some advanced topics that will elevate your skills and empower you to build even more sophisticated web applications.
Angular Routing: Navigating with Precision
What is Angular Routing?
Angular’s built-in router allows you to create single-page applications with smooth navigation. It enables the loading and unloading of components without a full-page refresh, providing a seamless user experience.
Setting Up Angular Router
To get started with Ang… routing, follow these steps:
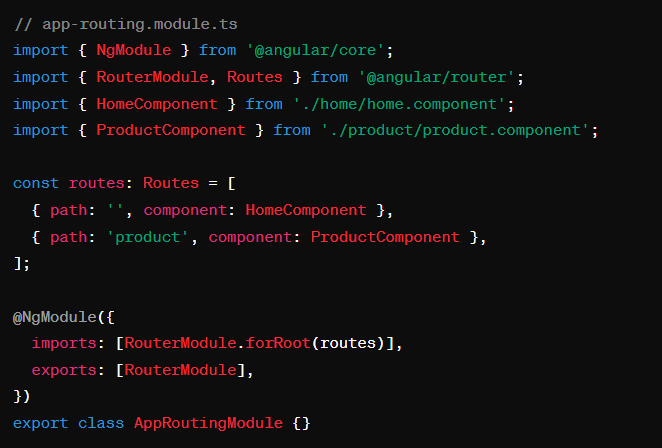
- Import the
RouterModuleandRoutesfrom@angular/router. - Define routes for your application, specifying the component to load for each route.
- Configure the routes using
RouterModule.forRoot()in the@NgModuledecorator.
1. Create Components:
Create the components that will be associated with each route. For example, let’s create components for a home page and a product page:

This will create home.component.ts and product.component.ts files along with their respective HTML and CSS files.
2. Define Routes:
In your Ang… application, create a file named app-routing.module.ts to define your routes:
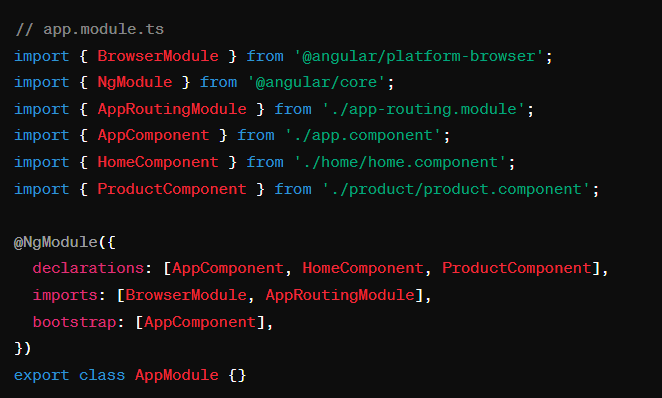
3. Configure App Module
Import and include the AppRoutingModule in the imports array of your main AppModule:
4. Create Router Outlet
In your main component template (usually app.component.html), add the <router-outlet></router-outlet> tag. This is where the content of the currently activated route will be displayed:

5. Add Navigation Links
In your application’s navigation menu or wherever applicable, add links to navigate between the defined routes. Use the routerLink directive to specify the route path:

6. Run Your Application:
Start your Ang… application using the ng serve command:

Open your browser and navigate to http://localhost:4200. You should see your application with navigation links, and the content of the selected route displayed in the <router-outlet>.
That’s it! You’ve successfully set up the Ang… Router in your application. You can extend this setup by adding route parameters, guards, and other advanced features based on your application’s requirements.
Implementing Navigation
Use the routerLink directive to create navigation links within your templates. The router.navigate method in your component code allows programmatic navigation.
1. Update app.component.html with Navigation Links:

3. Navigate Between Routes Programmatically:
You can also navigate between routes programmatically in your components. Let’s add a button in home.component.html to navigate to the product page when clicked.

In home.component.ts, define the navigateToProduct method:
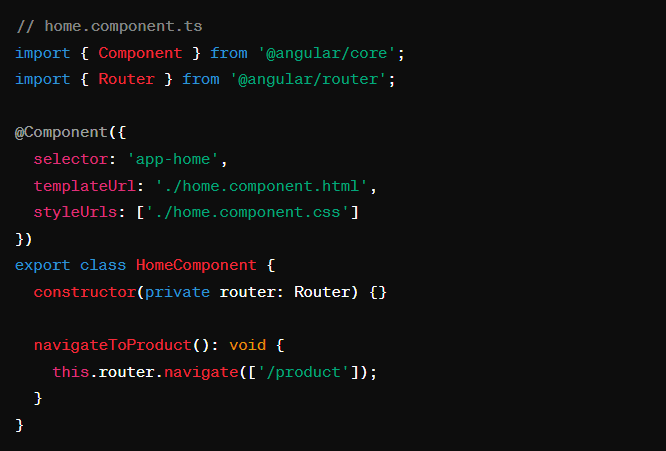
Now, clicking the “Go to Product Page” button in the home component will trigger programmatic navigation to the product page.
4. Run Your Application:
Start your Ang… application using the ng serve command:

Open your browser and navigate to http://localhost:4200. You should see the home page with navigation links. Clicking on the links or the “Go to Product Page” button will navigate you between different routes, and the corresponding components will be loaded in the <router-outlet>.
This example demonstrates both declarative navigation with the routerLink directive in the template and programmatic navigation using the Router service in the component.
Angular Forms: Handling User Input
Template-Driven Forms vs Reactive Forms
Ang… supports two approaches to handling forms: template-driven and reactive forms.
- Template-Driven Forms: Relies on directives in the template to build and validate forms.
- Reactive Forms: Form controls are created programmatically using TypeScript.
Table differences between Template-Driven and Reactive Forms
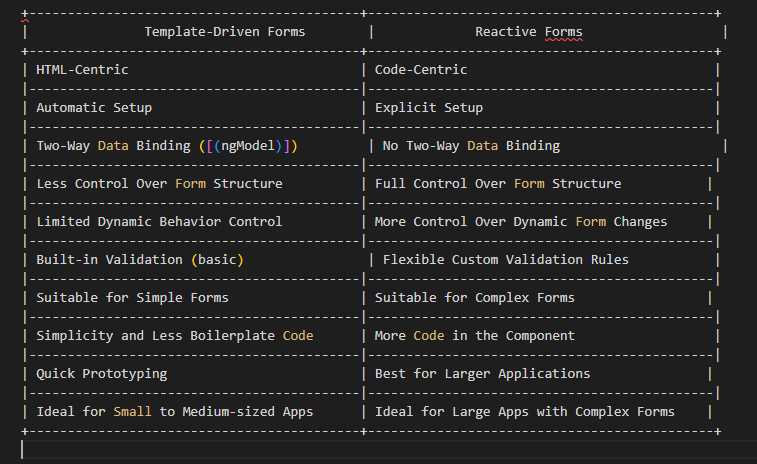
This table summarizes the key differences between Template-Driven and Reactive Forms in terms of their approach to form handling, control, data binding, validation, and suitability for different scenarios. Keep in mind that the choice between the two depends on the specific requirements and complexity of your application.
Building Template-Driven Forms
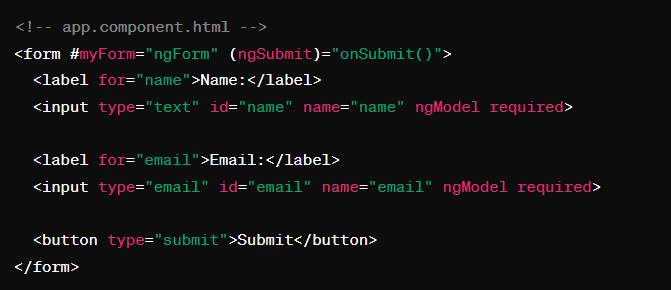
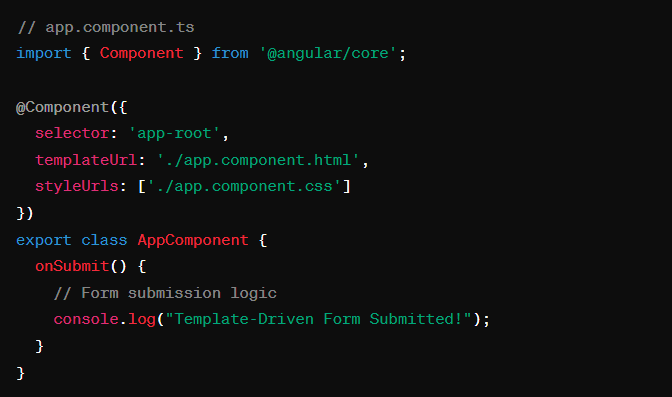
To create a template-driven form, use the ngForm directive and ngModel for two-way data binding. Ang… handles form validation automatically.
Building Reactive Forms
Reactive forms provide more control over form elements and validation. Use the FormGroup and FormControl classes to create dynamic and complex forms.

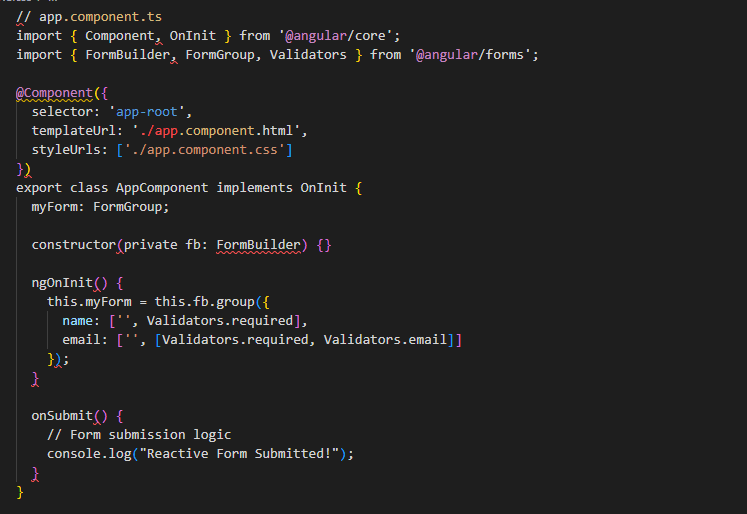
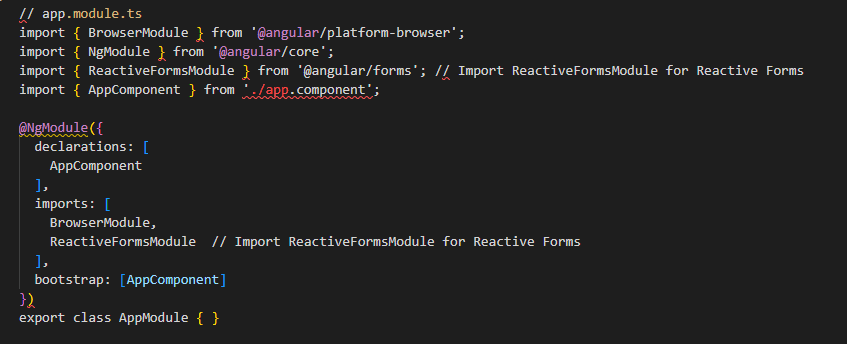
These code snippets illustrate a simple form for both Template-Driven and Reactive Forms. In the Reactive Form example, notice the use of formGroup, formControlName, and the FormBuilder service to define the form structure programmatically.
Angular HTTP Client: Connecting to the Server
Making HTTP Requests
Angular’s HttpClient module allows you to make HTTP requests to a server. This is crucial for fetching data, sending updates, and interacting with a backend.
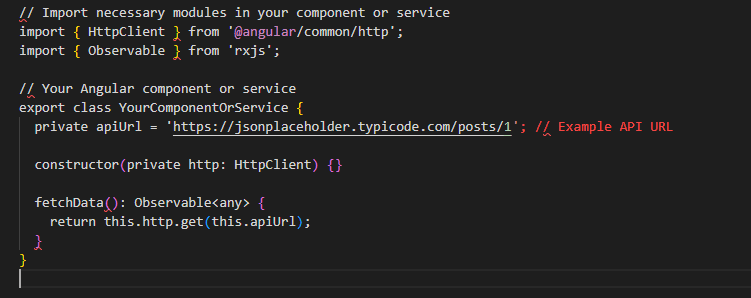
In this example:
HttpClientis injected into the constructor of the component or service.- The
fetchDatamethod sends a GET request to the specified API endpoint (this.apiUrl). - The method returns an
Observablethat can be subscribed to in the component to handle the response.
Remember to also include HttpClientModule in your Angular module’s imports:
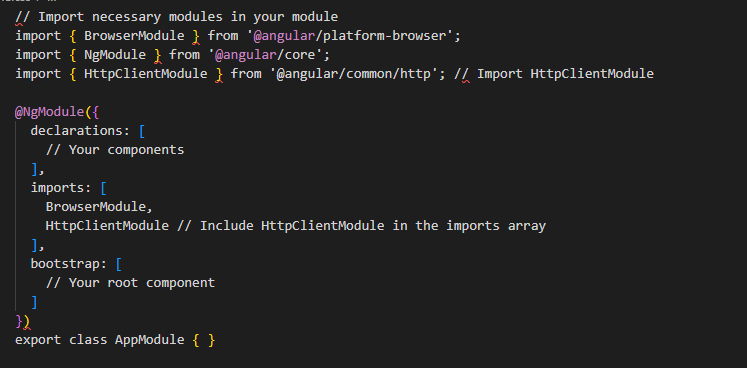
This example uses a simple placeholder API (https://jsonplaceholder.typicode.com/posts/1) for illustration purposes. Make sure to replace it with your actual API endpoint.
Remember, when using HTTP in a real application, handle errors, and consider subscribing and unsubscribing properly to manage the lifecycle of the HTTP request.
Handling HTTP Responses
Learn how to handle asynchronous operations with observables. Use methods like subscribe to process responses and errors from HTTP requests.
Handling HTTP responses in Angular involves using the RxJS Observable returned by the HTTP client’s methods (get, post, etc.) to subscribe to the asynchronous data stream. You can then process the data, handle errors, and take appropriate actions based on the response. Below is an example of handling HTTP responses using Angular’s HTTP client:
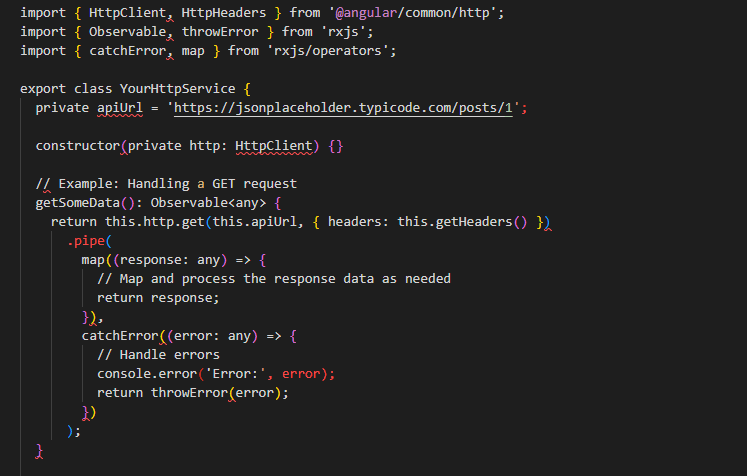
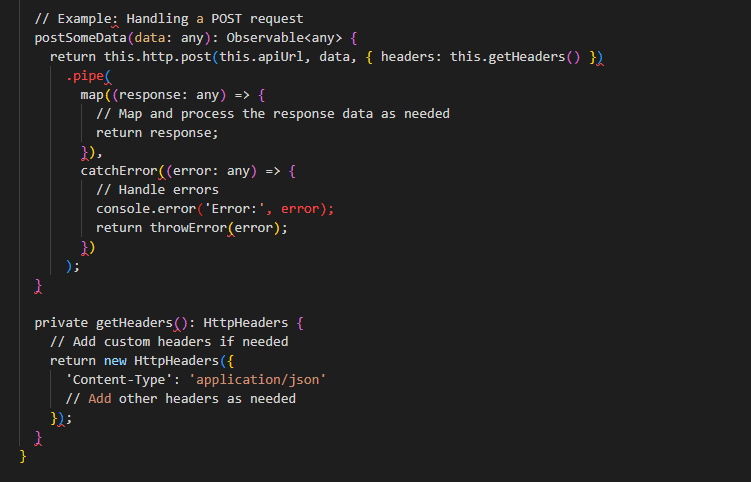
In this example:
mapoperator is used to transform the response data.catchErroroperator is used to handle errors and optionally rethrow them.- Custom headers can be set using
HttpHeadersfor each request.
Remember to subscribe to these methods in your components or services to initiate the HTTP requests:
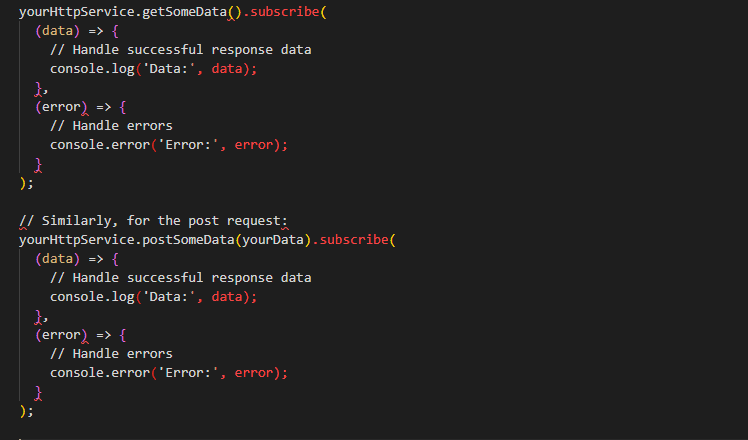
Ensure proper error handling and consider using Angular’s async pipe or manually managing subscriptions to handle the lifecycle of your HTTP requests properly.
Conclusion: Mastering Angular for Web Development Excellence
Congratulations on completing this comprehensive guide to mastering Ang…! We’ve covered the essential aspects of Ang…development, from the basics of setting up a project to exploring advanced features like routing, forms, and the HTTP client. As you reflect on your journey, remember that Angular is a powerful framework with endless possibilities for building dynamic and scalable web applications.
Your Angular Journey Continues
This blog post has laid a strong foundation for your Ang… knowledge, but there is always more to learn. Keep the following in mind as you continue your Ang… journey:
- Stay Updated: The world of web development evolves rapidly. Keep an eye on the official Angular documentation and community updates to stay informed about the latest features and best practices.
- Practice Regularly: The best way to solidify your understanding of Ang… is through hands-on experience. Work on real projects, contribute to open source, and challenge yourself with coding exercises.
- Engage with the Community: Join forums, attend meetups, and participate in online discussions. The Ang… community is vibrant and supportive, providing valuable insights and solutions to common challenges.
- Explore Additional Angular Features: Delve into more advanced topics, such as testing, internationalization, and performance optimization, to become a well-rounded Ang… developer.
Final Thoughts
Ang… is not just a framework; it’s a robust ecosystem that empowers developers to build dynamic and feature-rich web applications. Whether you’re creating a personal project, contributing to a team, or exploring the possibilities of a career in web development, Ang equips you with the tools you need.
Remember, the key to mastering Ang… lies in a combination of continuous learning, practical application, and a passion for crafting exceptional user experiences. As you embark on your Angular journey, stay curious, stay engaged, and most importantly, enjoy the process of becoming a proficient Ang… developer.
Thank you for joining us on this exploration of Ang. We hope this guide has been a valuable resource, and we wish you success in all your future Ang… endeavors!
Happy coding!


