Introduction to React
Unlocking React’s Potential: A Comprehensive Guide to Development
Welcome to the dynamic universe of React, where the power to craft modern and responsive web applications lies at your fingertips. In this comprehensive guide, we’ll navigate through the key aspects every developer must master, focusing on the fundamental building blocks that make React a game-changer in the world of front-end development.
Whether you’re a newcomer eager to set up your first React environment or a seasoned developer seeking to deepen your understanding of components, state management, and navigation, this guide has something for everyone. Join us on this educational journey as we explore the intricacies of React development, empowering you to create seamless, interactive, and visually stunning user interfaces. Ready to unlock React’s full potential? Let’s dive in!
Table of Contents
Setting Up a React Environment
Welcome to the exciting world of React! Setting up a proper development environment is the first crucial step on your journey to mastering this powerful JavaScript library. In this tutorial, we’ll guide you through the process, ensuring you have a solid foundation for building modern, scalable web applications using React.
Why a Proper Environment Matters
Before diving into the setup process, let’s understand why having a well-configured development environment is essential. React relies on a robust tooling ecosystem to streamline the development workflow and ensure code consistency. By setting up your environment correctly, you’ll enjoy benefits such as efficient code bundling, real-time updates, and simplified debugging.
Step 1: Node.js and npm Installation
React projects are typically managed using npm (Node Package Manager), which comes bundled with Node.js. Head over to the official Node.js website and download the latest LTS version suitable for your operating system. Once installed, npm will be available in your terminal or command prompt.
Step 2: Create React App
One of the quickest ways to initiate a React project is by using Create React App, a tool that sets up a new React project with a sensible default configuration. Open your terminal and run the following command:

Replace “my-react-app” with the desired name for your project. This command will download and configure a minimal React project structure for you.
Step 3: Project Structure Overview
Navigate into your newly created React project directory. Take a moment to explore the project structure. Key directories include “src” for your source code and “public” for static assets. Understanding this structure will help you organize your code effectively.
Step 4: Running Your React App
To see your React app in action, use the following commands:

This will start a development server, and you can view your app in your browser at http://localhost:3000. Any changes you make to your code will trigger hot-reloading, making the development process smooth and efficient.
Components and Props
In the world of React, understanding components and props is akin to grasping the fundamental building blocks of your application. Let’s dive into these concepts, unravel their significance, and see how they play a pivotal role in crafting dynamic and modular user interfaces.
Components: The Heart of React
At its core, React is a component-based library. A component is a reusable, self-contained piece of code responsible for rendering a specific part of the user interface. Components can be as simple as a button or as complex as an entire page.
When structuring your React application, think of components as Lego bricks—modular pieces that come together to create a cohesive and flexible UI.
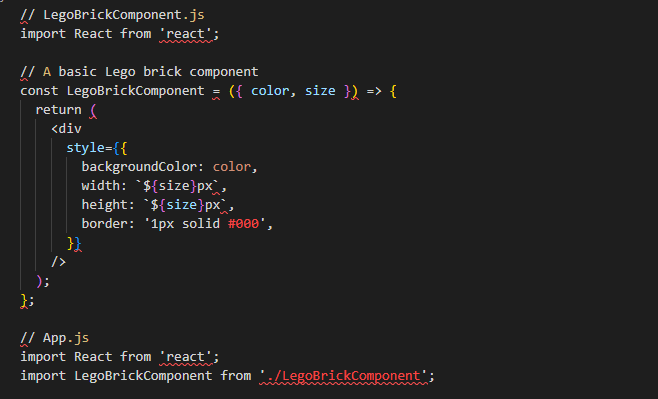
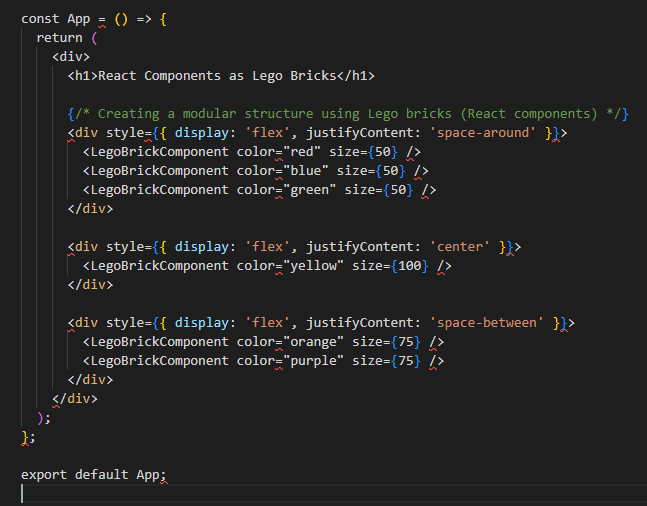
In this example
- The
LegoBrickComponentrepresents a basic React component acting as a Lego brick. - The
Appcomponent uses the Lego bricks (React components) to build a modular structure. - The size and color of each Lego brick are customizable through props, showcasing how components can be configured for different purposes.
- The structure of the Lego bricks can be easily modified or extended, emphasizing the modularity and flexibility of React components.
Functional Components vs. Class Components
React components come in two flavors: functional and class components. Functional components are concise, stateless functions, while class components have additional features like local state and lifecycle methods.
In modern React development, functional components are preferred for their simplicity and the introduction of Hooks, allowing functional components to manage state and lifecycle events.
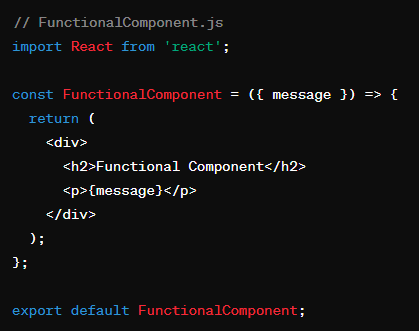
Functional Component
Class Component
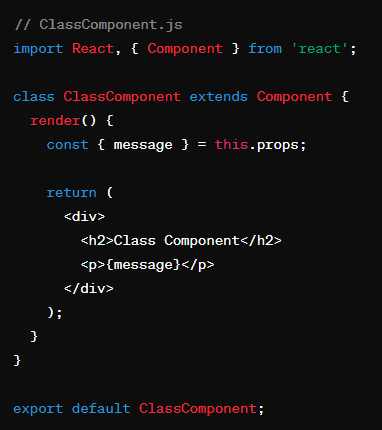
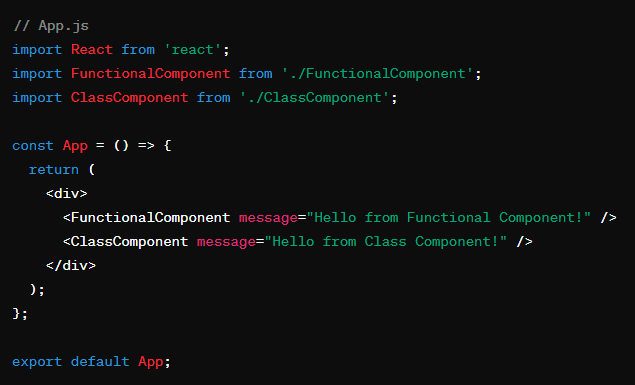
In this example
- The
FunctionalComponentis a simple functional component that receives a prop (message) and renders it. - The
ClassComponentis a class component that extendsReact.Component. It also receives a prop (message) and renders it. - Both components achieve the same result, displaying a heading and a paragraph with the provided message.
You can use these components in your main application or another component like this:
Props: Passing Data between Components
Props, short for properties, are a mechanism for passing data from a parent component to its child components. They allow you to customize and configure child components dynamically.
Imagine you have a Button component. Using props, you can easily customize its label, style, or even the function it performs when clicked.
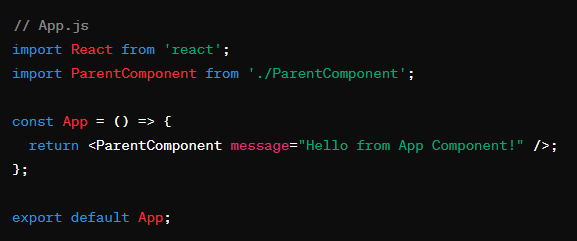
App Component
- Renders
ParentComponent. - Passes a prop called
messagetoParentComponent.
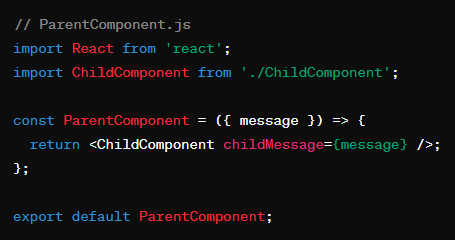
ParentComponent
- Receives the
messageprop fromApp. - Renders
ChildComponent. - Passes the received
messageprop toChildComponentaschildMessage.
ChildComponent
- Receives the
childMessageprop fromParentComponent. - Uses the received prop to display a message.
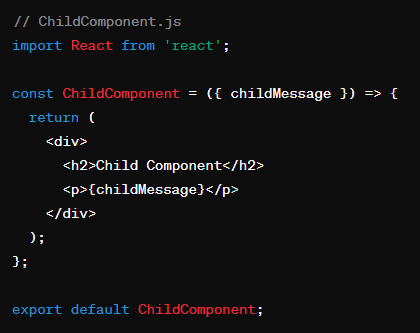
This flow illustrates how the message prop travels from the App component down to the ParentComponent, and then from the ParentComponent to the ChildComponent. Each component only receives the props it needs, promoting a clear and modular design.
Example: Utilizing Props in a React Component
Let’s consider a simple example. You have a UserProfile component that displays user information. You can pass the user’s details as props to this component:
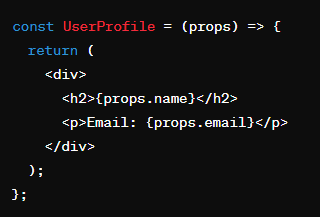
In this example, name and email are props that you can customize when using the UserProfile component.
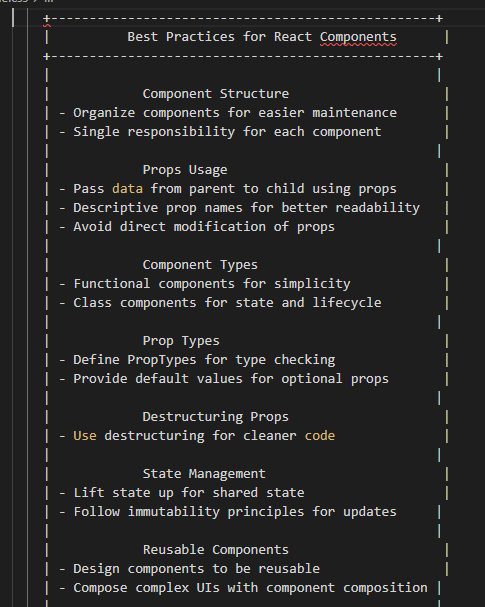
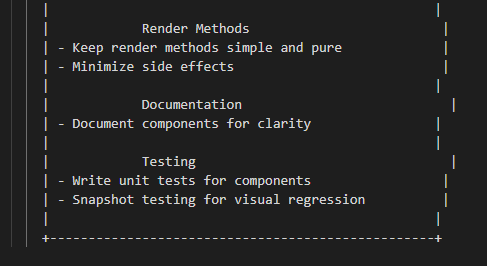
Best Practices and Tips
Keep Components Small and Reusable: Aim for small, focused components that can be easily reused throughout your application.
Prop Types: Utilize prop types to define the expected types for your props. This enhances code robustness and documentation.
Default Props: Provide default values for props whenever possible to ensure your components gracefully handle missing data.
State and Lifecycle in React
Understanding state and lifecycle methods is like having a compass in the world of React. These concepts are central to managing dynamic data and responding to events over the lifecycle of your components. Let’s explore how state and lifecycle methods contribute to building responsive and interactive React applications.
State: The Pulse of Your Component
In R, state represents the data that can change over time. Unlike props, which are passed down from parent to child, state is managed within a component and can be updated based on user interactions or other triggers.
Think of state as the dynamic aspect of your component, holding information that can be modified and reflected in the user interface.
Consider a R component called DynamicComponent:
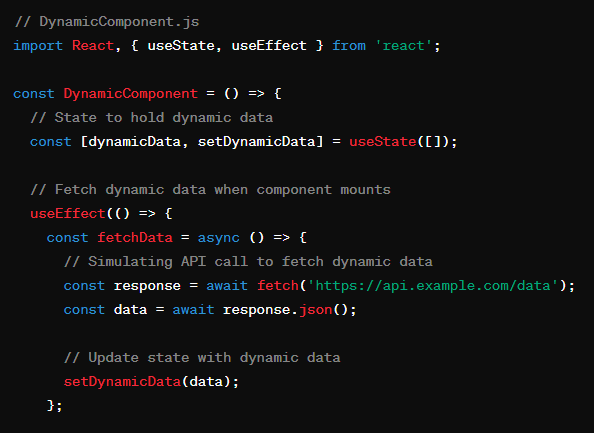
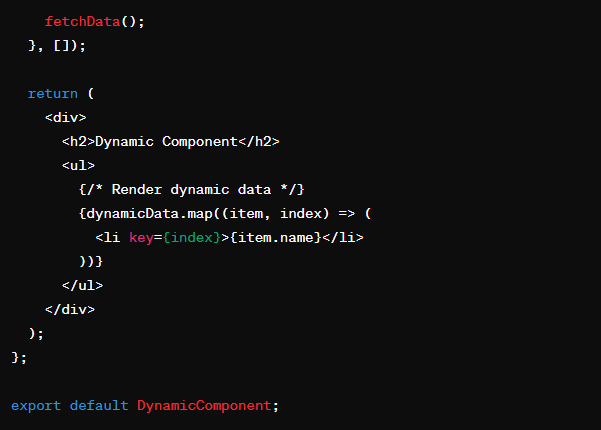
In this example
- The
DynamicComponenthas a local statedynamicData, initialized as an empty array using theuseStatehook. - The
useEffecthook is used to fetch dynamic data when the component mounts (you can replace the API call with a real one). - The component renders a heading and a list (
ul) dynamically based on the fetched data.
Visualize this component as having a section (perhaps a box) labeled “Dynamic Component” with a list underneath. The list items represent dynamic data fetched from an API. The component’s state (dynamicData) is responsible for holding and updating this dynamic information.
When creating an actual visual representation, you might use shapes, colors, and labels to highlight different parts of the component, making it more visually appealing and conveying the concept of dynamic data and state.
Declaring State in a React Component
To declare state in a functional component, you can use the useState hook introduced in React 16.8:
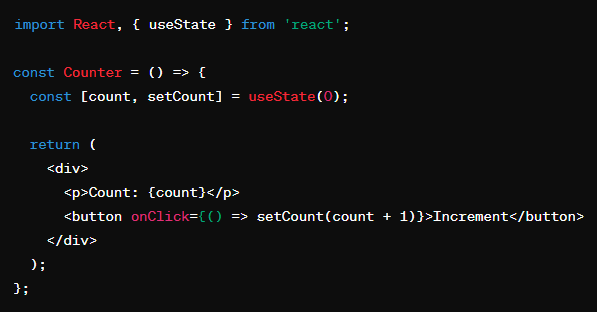
Here, count is a state variable, and setCount is a function to update its value.
Lifecycle Methods: Choreography of Component Events
R components go through different phases in their lifecycle, from creation to destruction. Lifecycle methods allow you to hook into these phases and execute code at specific points.
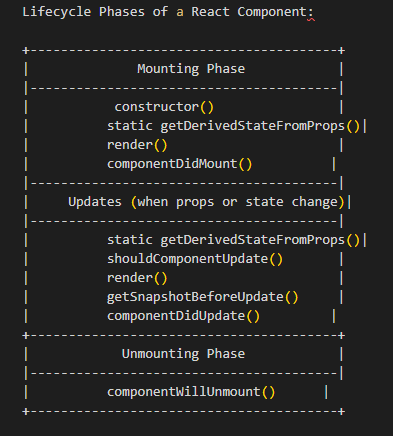
Mounting Phase
constructor(): Initialize state and bind methods.static getDerivedStateFromProps(): Rarely used. Adjust the state based on changes in props.render(): Create the component’s UI.componentDidMount(): Perform side effects, such as data fetching or subscriptions, after the component mounts.
Updating Phase
static getDerivedStateFromProps(): Adjust the state based on changes in props.shouldComponentUpdate(): Decide whether the component should re-render.render(): Re-render the component’s UI.getSnapshotBeforeUpdate(): Capture information before the UI updates.componentDidUpdate(): Perform side effects after the component updates.
Unmounting Phase
componentWillUnmount(): Perform cleanup before the component is removed from the DOM.
Each phase corresponds to specific lifecycle methods, allowing developers to execute code at different points in a component’s existence. Keep in mind that some methods are considered legacy and might be deprecated in future versions of R. The newer versions use features like hooks for handling side effects and state management.
Example: Using componentDidMount for Fetching Data
Consider a scenario where you need to fetch data when a component mounts. You can use the componentDidMount lifecycle method:
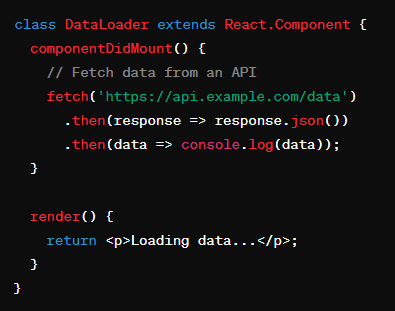
Here, the data fetching logic is placed in the componentDidMount method, ensuring it runs after the component has mounted.
Best Practices and Tips
Use State Sparingly: Only use state for data that changes over time. If a value doesn’t change, it’s often better suited as a prop.
Leverage Lifecycle Methods Wisely: Be mindful of which lifecycle methods you use. Overusing them can lead to complex and harder-to-maintain code.
React Router and Navigation
In the realm of R applications, effective navigation is the key to providing users with a smooth and intuitive experience. Enter R Router, a powerful library that enables the creation of dynamic, single-page applications (SPAs) by managing navigation and rendering components based on the URL. Let’s dive into the world of R Router and explore how it transforms the way users navigate through your app.
Introduction to React Router
R Router is a declarative routing library for React applications. It enables the creation of navigation structures, allowing users to move between different views or pages without the need for a full-page reload. This makes R Router an essential tool for building modern, responsive web applications.
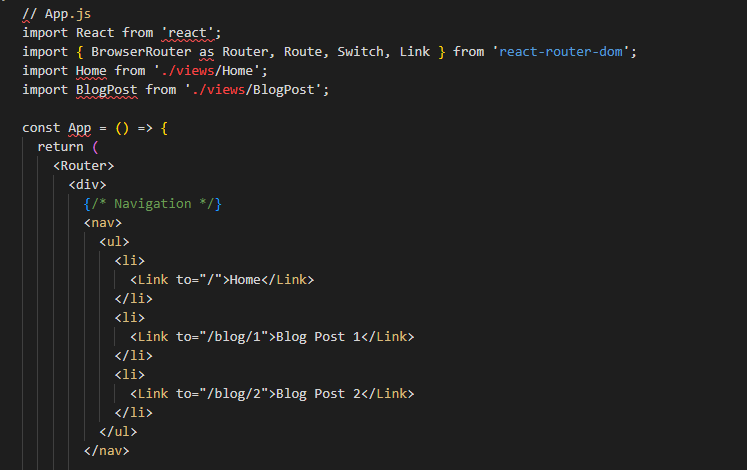
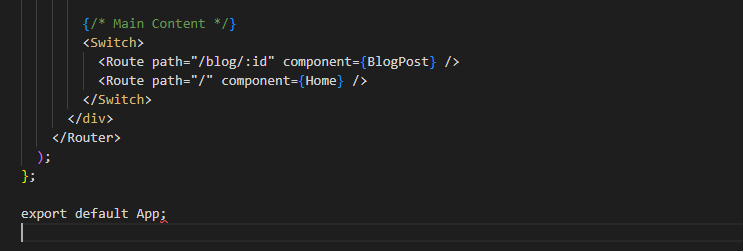
Basic Setup with React Router
To get started, install R Router using npm:

Once installed, you can use the BrowserRouter component to wrap your application and enable routing. Routes are defined using the Route component, specifying the path and the corresponding component to render.
Creating Routes and Navigating
Let’s create a simple example with two components, Home and About, each associated with a specific route:
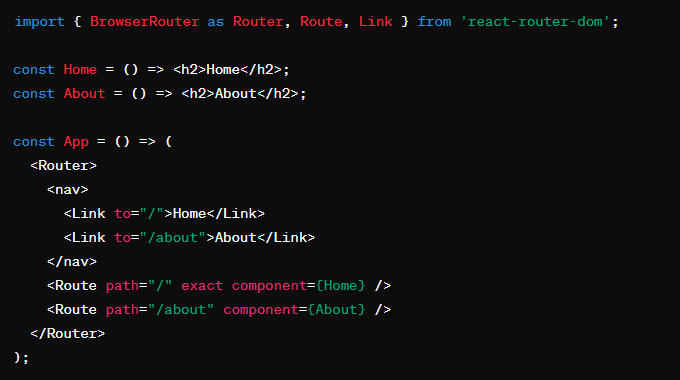
In this example, the Link component is used to create navigation links, and the Route component defines which component to render based on the URL path.
Route Parameters and Dynamic Routing
R Router allows for dynamic routing by incorporating parameters into the route path. This is particularly useful when dealing with dynamic data or user-specific content.
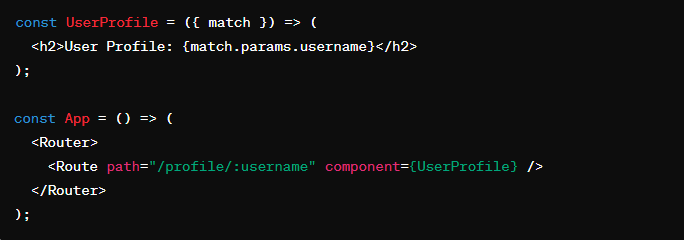
In this example, the :username parameter is extracted from the URL, making the route dynamic.
Nesting Routes for Complex UIs
For more complex applications, you may need to nest routes to organize your UI effectively. This is achieved by nesting Route components within each other.
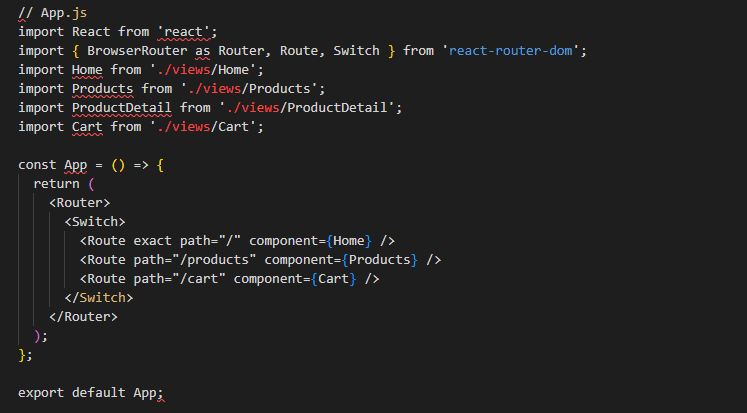
Home (Home.js):
- Displaying featured products, promotions, etc.
Products (Products.js):
- Displaying a list of product categories.
- Nested route for individual product categories.
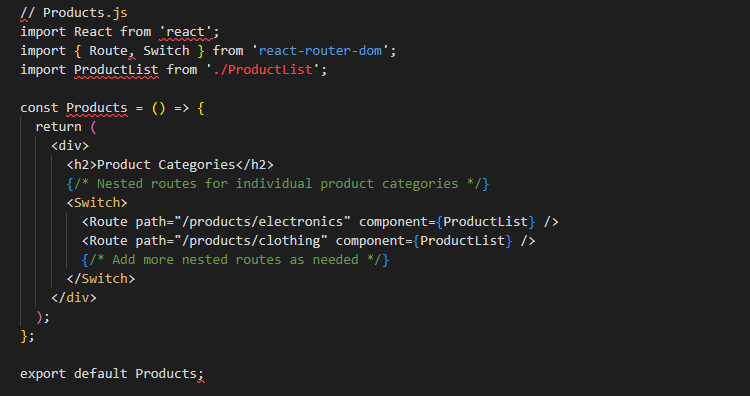
ProductDetail (ProductDetail.js):
- Displaying details of a specific product.

Cart (Cart.js):
- Displaying the shopping cart contents.

In this structure
- The
Productsview has nested routes for different product categories. - Each product category can have its own nested routes for specific products.
- The
Switchcomponent ensures that only the first matching route is rendered.
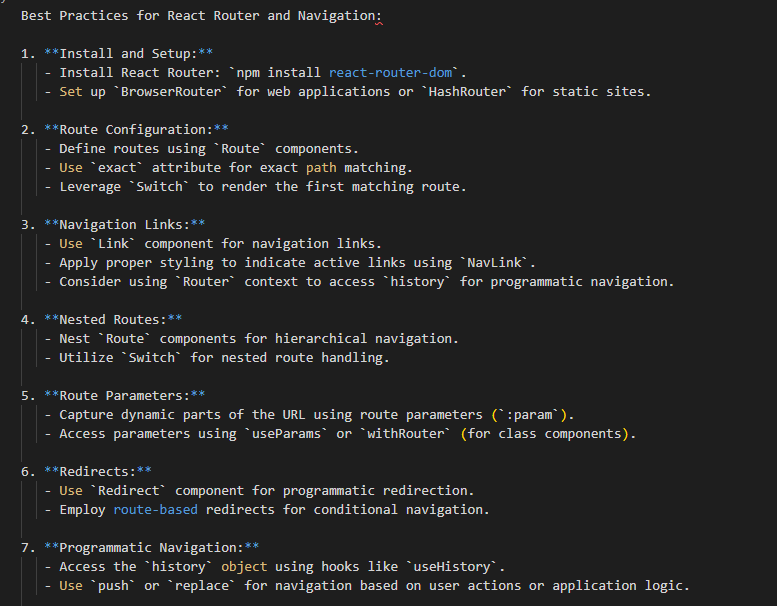
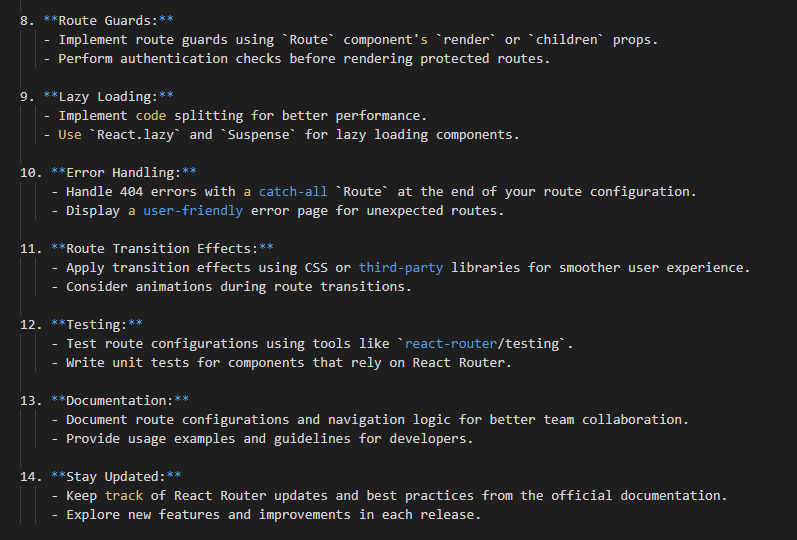
Best Practices and Tips
Keep Navigation Intuitive: Design your navigation structure to be user-friendly and intuitive. Clear and organized navigation enhances the overall user experience.
Lazy Loading for Performance: Consider lazy loading components for routes that may not be immediately needed, improving the initial loading performance.
Conclusion: Navigating React’s Landscape with Confidence
Congratulations! You’ve embarked on a journey through the essential aspects of R, laying the foundation for creating robust and interactive web applications. Let’s recap the key insights gained from each section:
Setting Up a React Environment: We delved into the initial steps of configuring your development environment, utilizing tools like Create R App, and ensuring a smooth start to your R projects.
Components and Props: You’ve mastered the art of creating modular components, passing data through props, and structuring your R applications for reusability and maintainability.
State and Lifecycle in React: With a deeper understanding of state and lifecycle methods, you’re equipped to manage dynamic data and orchestrate events within your components, enhancing their responsiveness.
React Router and Navigation: The power of R Router has been unveiled, allowing you to seamlessly navigate between views, create dynamic routes, and provide users with an intuitive and engaging experience.
As you continue your R journey, remember these core concepts and best practices:
Keep Your Components Modular: Embrace the component-based architecture of R, keeping your components small, focused, and easily reusable.
Harness the Power of State: Use state judiciously for managing dynamic data within your components, and leverage lifecycle methods for precise control over component events.
Navigate with Precision Using React Router: Design intuitive navigation structures, create dynamic routes, and ensure a seamless user experience with React Router.
Whether you’re a novice or seasoned developer, these foundational principles will serve as your compass, guiding you through the intricate landscapes of R development. The journey doesn’t end here; the React ecosystem is ever-evolving, with new features and best practices continually emerging.
So, with newfound knowledge and confidence, go forth and build! Create applications that not only meet user expectations but exceed them. Your ability to craft immersive and responsive user interfaces is now empowered by the robust tools and concepts explored in this guide.


The point of view of your article has taught me a lot, and I already know how to improve the paper on gate.oi, thank you.